Binauralization Workflow
Table of contents
- 1. Software
- 2. "Dry" song
- 3. Ambisonics convolution
- 4. Stereo convolution
- 5. Comparison
- 6. Bidule files
1. Software
I'm going to use Plogue Bidule and Adobe Audition, with some free VST plugins:
- SPARTA Plugins
- Xvolver for the convolutions
- O3A plugins
- Kronlachner's Ambix plugins
2. "Dry" song
This is just the original song with a binauralization, so that the two channels arrive to the listener from +-30°
To achieve this, I just take the original file and pass it through the SPARTA binauraliser.

In the binauraliser plugin itself I've only selected the Stereo preset, which already has the correct angles

The binauraliser works by convolving with HRTFs and interpolating between them.
The Sparta plugins support both 44.1 and 48kHz, but it's probably better to just pick one sampling frequency and stick to that (including in the project settings), in order to avoid mistakes.
Here are the original song and its binauralization
3. Ambisonics convolution
In order to perform a useful comparison, I'm using the impulse responses from the York Minster, because they have both the B-format and the stereo data.
The first thing we must notice is that they are provided in Furse-Malham (FUMA) format, whose channel order is WXYZ. Most modern plugins assume the Ambix (Ambisonics eXchange) format, whose channel ordering is WYZX. The SPARTA plugins actually support both, but I think it would be better to be consistent.
As already mentioned, we should also make sure that they are in the same sampling rate as everything else, which is already the case with the IRs for the York Minster.
3.1 Brief aside: meaning of Ambisonics channels
Ambisonics works with Spherical Harmonics, but without getting boggled into the mathematics, we can instead use an equivalent microphone model. W is an omnidirectional microphone, and therefore it captures pressure. X, Y, and Z are figure-8 microphones, so they capture particle velocity.
From the frame of reference of the microphone, X is straight ahead, Y goes to the left, and Z goes up.

And on these axes we can see how the virtual microphones obtained from the spherical harmonics look. Image from Wikipedia and quickly annotated. The non-annotated spherical harmonics are used in higher order implementations of Ambisonics, in this case First Order is perfectly adequate.

3.2. Converting the IRs to Ambix
This is done automatically by the "O3A Injector - FuMa", which in Audition is available under Effects > VST > Spacializer > Blue Ripple Sound Limited.

It also specifies from which format to which format it's performing the conversion.

3.3. Obtaining a convolution matrix
If we were to use the Impulse Response on both channels of our input file, we'd localize both of them in the position where the source was when the measurement was taken, right in front of the listener.
Of course that is not the correct spatiality for a vocal ensemble, which is not really a punctiform omnidirectional source. Also, that is not how the stereo file we're working with was designed for.
In order to attempt a more natural localisation, we're going to rotate the entire Ambisonics soundfield 30° left, 30° right, and then concate the two resulting files, so that we get a 2x4 convolution matrix.
Convolution without rotation
This step is just for providing a point of comparison. We're going to just convolve both channels of the song with the impulse response. However, we should be careful, if we don't duplicate the IR we risk convolving the right channel with the reverberant tail instead.
In fact, if we just set Xvolver to 2 inputs and 4 outputs and select the IR, we get something like this, notice how the right column is empty.

We should create a file in which the IR is simply repeated twice.
Loading this one in Xvolver, it will look like this, with the same data in both columns.

This is a very rough sketch of what we're doing, geometrically.

And this is the extremely simple Plogue Bidule setup

The SPARTA ambiBIN plugin goes from a First Order Ambisonics Signal to a binaural signal.

Obtaining a "stereo" convolution matrix
In order to simulate the wideness of the real source, we can use Kronlachner's Ambix Rotator, under Effects > VST > Effect > kronlachner > ambix_rotator_o1

Conceptually, what we want to do is basically a rotation of the whole environment, while the receiver stays still. This is not the cleanest possible way of doing this, but the only really correct way of simulating the proper Apparent Source Width would be to have measurements with two different source positions and the same microphone position.

We open the Ambix version of the IR, then we give it a Yaw rotation of -30°, and save the resulting file as Ambix_Left.wav
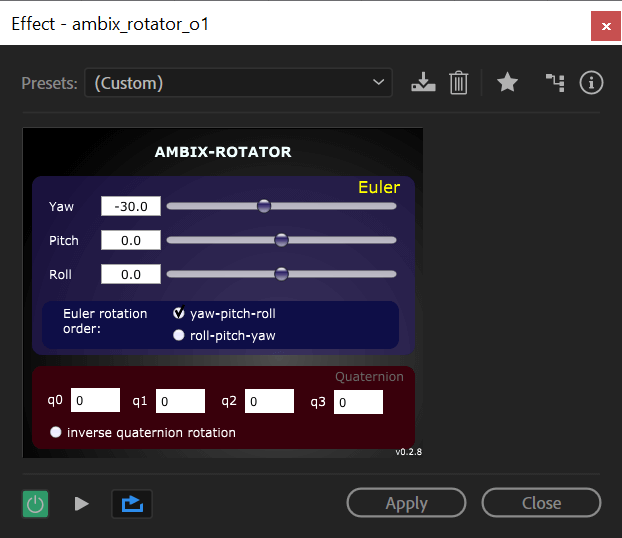
We open the original Ambix IR once again, and this time we give it a Yaw rotation of +30°, and save the resulting file as Ambix_Right.wav.
At this point we open both of them, and copy the Right IR just after the Left, as shown in this video (which is basically the same thing as the previous video).
We save this as Ambix_Left+Right.wav and load it as our convolution matrix in Xvolver.
It is important to give Xvolver a low-enough Output Gain, otherwise the output file tends to be saturated.
Here are the original song, its convolution with the original IR, and its convolution with the Left+Right matrix.
As it is quite apparent, it is basically impossible to tell the two Ambisonics versions apart, even using a Flare plugin. Original IR on the left, Left+Right IR on the right.
This is because the microphone was in the reverberant field, and the direct sound is comparatively tiny. In theory the human hearing system should be able to perceive the source width much better than a Flare, and there are ways of calculating this Apparent Source Width. However, I suspect that depends on the ability of moving one's head around, which users will not have in this experiment.
Therefore my conclusion is that using the original IR is good enough for the purposes of the experiment.
4. Stereo Convolution
As it turns out, using the Impulse Responses that are only available in stereo format is not that hard, we just need to convolve our stereo song with the stereo IR, having first diagonalized it.

This way the left channel of the stereo song gets convoluted with the left channel of the IR, and the right channel gets convoluted with the right channel of the IR.
5. Comparison
In order to perform a proper comparison, I've assembled a Plogue Bidule file that produces both the "dry" song, the Ambisonics convolution and the stereo version.

We basically have three simultaneous workflows, on the left the direct binauralization, in the middle the Ambisonics, on the right the stereo IRs. We can instantly switch between them using the Int Variable. If we set it to 1 the output is the direct binauralization, if we set it to 2 it's the Ambisonics, and if we set it to 3 it's the stereo workflow.
Here are the computed output files.
Conceptually the stereo version works like in this figure, it's an ORTF pair facing towards the sound source.

In all the cases we considered we are obtaining a very narrow and very central sources, except the stereo IR, where we can clearly hear, for example, that the soprano (at least I think it's a soprano :D) stays on the left.
Given that the best result is actually from the ORTF stereo pair, we could try to emulate it by placing virtual microphones in the Ambisonics soundfield.
In conclusion, using the stereo Impulse Responses is perfectly acceptable, and it might even be preferrable in terms of apparent source width. Given the purpose of the experiment the apparent source width shouldn't be all that important anyway, but further work is needed for improving it in the Ambisonics case.
There is another case we haven't considered: IRs done with a dummy head. Rotating a binaural signal is a bit more complicated, we need to use both ITD (time difference between the channels, which works under 1kHz) and ILD (a frequency dependent attenuation).
6. Bidule file
All the files and the relative Bidule file are in this archive (178MB).